
When you have a Tablet PC such as the Surface Pro 3, it is really easy to get stuck using OneNote for everything. After all, the two are a perfect match. But – there are plenty of other applications out there that can very effectively leverage the stylus. In this four part series (yes, I’ve added another part in the planning!), I’m going to look at Word, PowerPoint, Excel and Outlook, giving real life examples of how I have used the stylus in the software for my classes, and then a quick how to guide if you want to get out and give it a go.
Microsoft PowerPoint is an amazing presentation and an underutilised graphics editing program. Unfortunately, it is much maligned with people being “PowerPointed to death” – but this is the fault of presenters and creators, not the software. But both the graphics creation use, and presentation tips is a topic for another blog at another time. In the meantime, check out Ineke McGuire’s article on boring people to death and Toby Trewin’s article on other uses for PowerPoint.
When it comes to creating PowerPoint documents, once again it is keyboard and mouse centric. This makes sense – it’s about presenting information in high fidelity, with a polished product – and the linearity of these inputs suit this type of product.
But what if you pick up your stylus?

As soon as you do, there are three main things that you can easily do:
- You can highlight on the page, in multiple colours
- You can annotate all over the page, in multiple colours
- You can do this in both document creation mode, and document presentation mode.
In creation mode, picking up a stylus allows you to draw, write and highlight in an intuitive way – and sometimes, the handwritten comment brings immediate attention to a specific piece of the content in a way no typeface can do. This planned use of inking as part of a presentation can be very engaging for the audience and empowering for the presenter. You can also do some sneaky things with a white pen on a white background, using the white ink to edit out parts of images or diagrams that you have sourced elsewhere.
What opens far more doors for me though, is the use of the stylus when presenting. Over my years of using presentation tools, I’ve come to a realisation that for me simpler is better. I now predominantly use a blank slate (a white slide) with a small amount of pre planned content (some would call these power points!) that then get annotated all over live with the class as we co-create the content together. The students find this more relevant and engaging, and I find myself seriously responding to student needs and understanding as I progress.
Here’s how to Annotate in creation mode
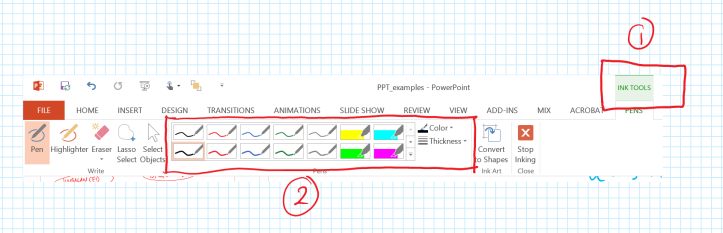
- As soon as you bring your stylus near the screen in PowerPoint, a new toolbar pops into existence, the INK TOOLS.
- From the menu that appears, choose the pen or highlighter you want, and away you go!

Here’s how to Annotate in presentation mode
- As soon as you bring your stylus near the bottom left of the screen in the PowerPoint presentation, a small transparent toolbar pops into existence. Click the pen icon.
- From the menu that appears, choose the pen or highlighter and then
- Choose the colour you want, and away you go!
- As a final note – when you finish your presentation, you will be asked if you want to save your annotations. It’s very safe to say yes, as all the annotations for a slide a grouped together a single object, so if you need to remove them, one click and delete does the job.

So the stylus in PowerPoint brings some very interesting possibilities to light and, I think, helps us as educators change the way we create content. This was supposed to be the last article in the series, but by popular demand (OK, one person sent me an email!) I’m going to do a bonus fourth article looking at using the stylus in Outlook.

[…] Microsoft PowerPoint is an amazing presentation and an underutilised graphics editing program. Unfortunately, it is much maligned with people being “PowerPointed to death” – but this is the fault of presenters and creators, not the software. But both the graphics creation use, and presentation tips is a topic for another blog at another time. In the meantime, check out Ineke McGuire’s article on boring people to death and Toby Trewin’s article on other uses for PowerPoint. You can learn all about making your stylus a hit in PowerPoint by reading this blog post. […]
LikeLike
Hi) thanks for sharing…now would you get the same functionality in powerpoint with a surface 3?
LikeLike
Great summary just one more remark on convert to shapes this can be done automatically squares or circles etc. I think that is worth mentioning this existed before in windows journal but is missing in one note
LikeLike
Thanks that’s really interesting and useful. Do you use a surface pro in class and is it wirelessly connected to a projector?
I agree with reducing the content of slides in class.
LikeLike