
When you have a Tablet PC such as the Surface Pro 3, it is really easy to get stuck using OneNote for everything. After all, the two are a perfect match. But – there are plenty of other applications out there that can very effectively leverage the stylus. In this four part series I’m going to look at Word, PowerPoint, Excel and Outlook, giving real life examples of how I have used the stylus in the software for my classes, and then a quick how to guide if you want to get out and give it a go.
Outlook is a brilliant program for communication and organisation. It covers off on email communication, calendar scheduling (including synchronisation across devices) and task management. Add OneNote to the mix, and you got the tools you need for complete organisation control – but you can read about that here in my organisation trinity article.
Just like the rest of the Office programs that we have covered, Outlook is predominantly centred on entering text with the keyboard, and navigating and clicking with the mouse. And as per the rest of the Office suite, this is fit for purpose, as it is a very efficient way of getting linear information into software.
But what if you pick up your stylus?
As soon as you do, there are three main things that you can easily do:
- You can highlight on the page, in multiple colours
- You can annotate all over the page, in multiple colours
- You can do this in any of the three components of Outlook – email, calendar or tasks.
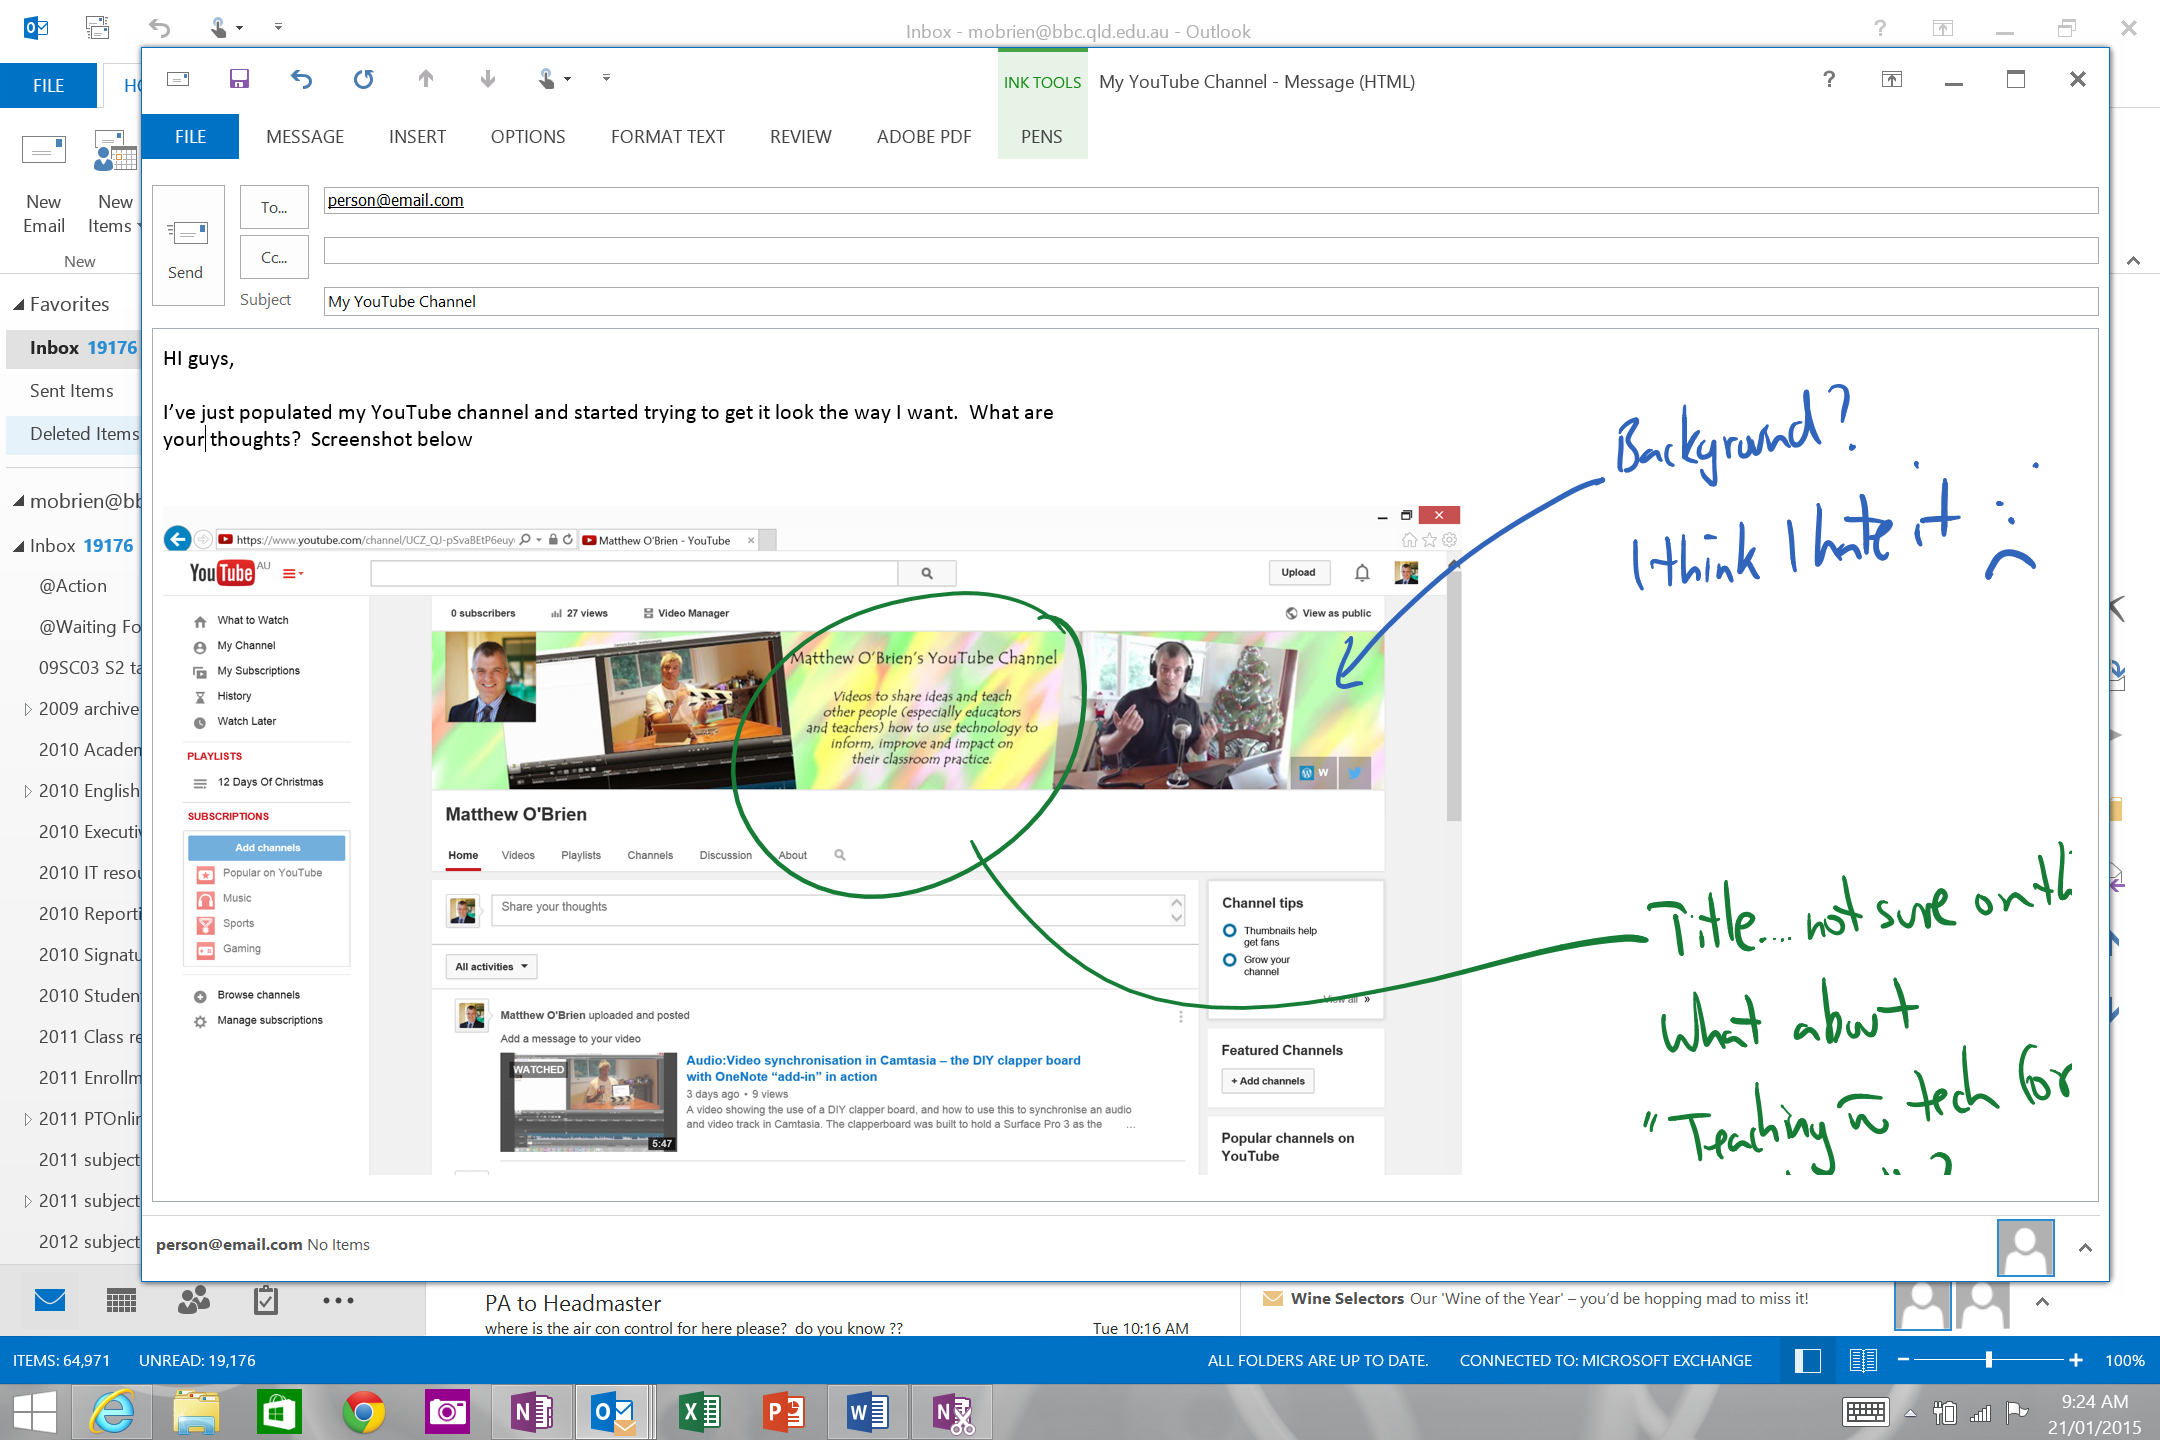
In email, the value is obvious. You can handwrite a quick message – perfect for that quick reply, especially if you are, for arguments sake, in a meeting and you don’t want people to know you are emailing. You can also draw to explain, or annotate all over an inserted document or email reply. This kind of explanation and review is simply not possible without a pen or stylus of some kind.
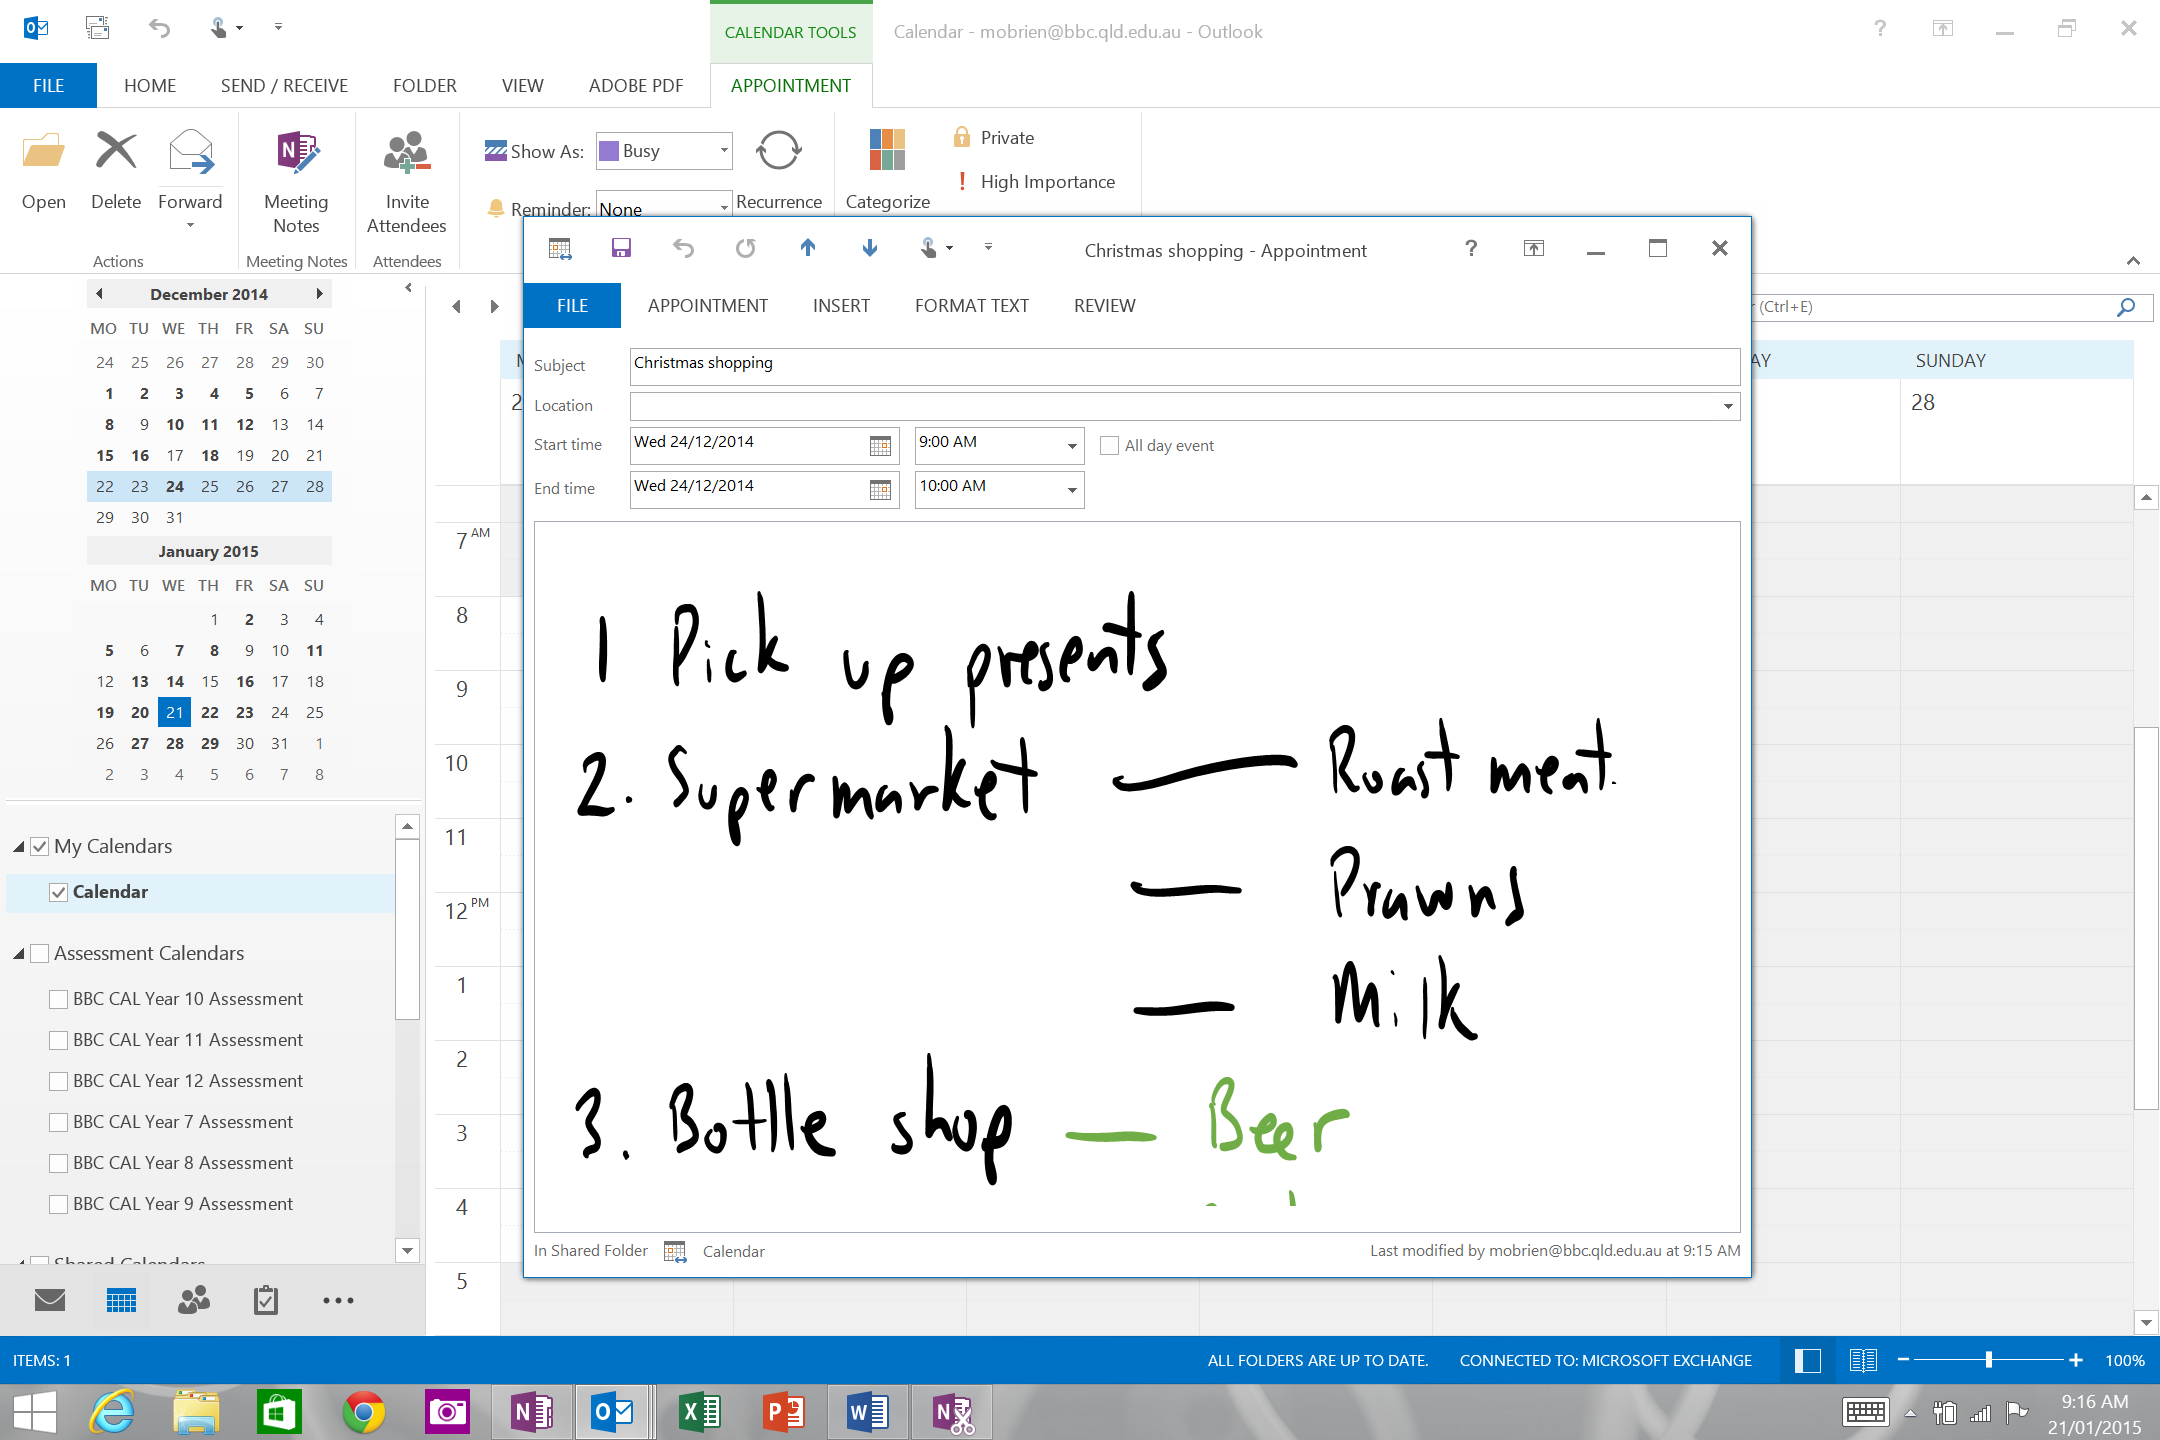
I used to love post it notes – but in my digital life they just didn’t work. I tried a few software versions, but none filled the need for me – however, when I discovered that you can use the stylus in calendar appointments and tasks, I found the perfect solution – for me, having my “post it notes” in my calendar and task lists, and having these synchronised between my devices (and especially to my phone!) meant I always had them when I needed them – and I actually acted on the ones that had times associated with them – imagine that!
It is important to realise that you can only annotate in the message/calendar/task pane – in any of the fields above the pane, you need to either type or use the stylus input pane.
Here’s how to use the onscreen keyboard/stylus input pane for Outlook fields
Click in the field you want to enter text into, and then:
- At the bottom right of the screen click the onscreen keyboard/stylus input pane icon. The onscreen keyboard will appear – you can either use this to “type” or you can
- Click the Stylus input pane icon and
- Handwrite on the lines to convert your handwriting to text.


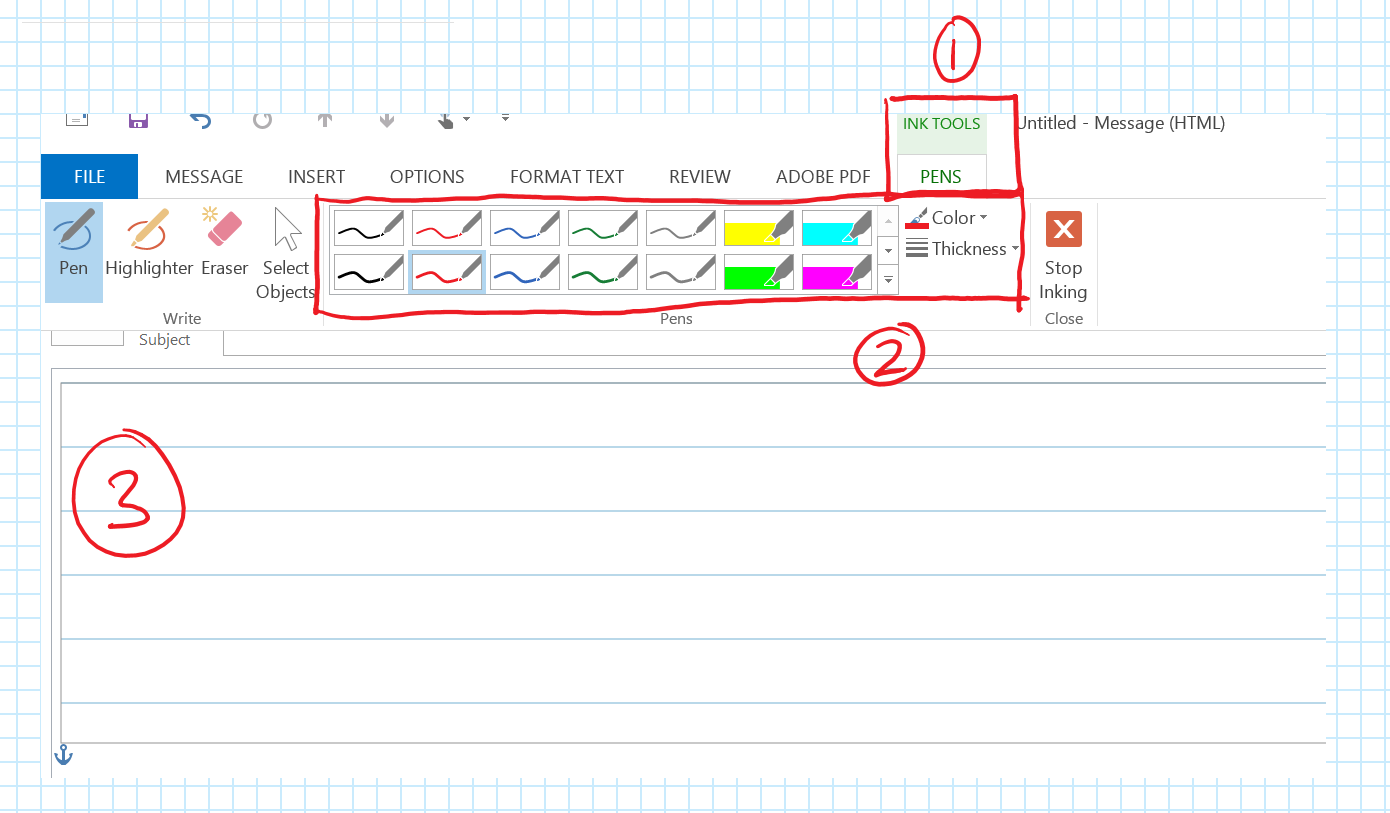
Here’s how to Annotate in Outlook
Remember this only works in the main email/calendar/task pane. You must have clicked in the pane for this to work!
- As soon as you bring your stylus near the screen in Outlook, a new toolbar pops into existence, the INK TOOLS.
- From the menu that appears, choose the pen or highlighter you want, and away you go!
- Lines will appear that you can write on – but you aren’t limited to this space – you can drag the box larger if you need. You also are not limited to writing within the box – you can annotate over any content outside of the box as well!
So that’s the last of the applications I plan to look at in this series – hopefully you can see that there are consistent behaviours between all the Microsoft Office applications when it comes to stylus use and interaction, and I hope I have been able to show you not only how to use the stylus, but why you should, with some use cases. Whilst this series is now complete, I’m not going to stop here – there will be a video coming up to show how to do all of this, along with a summary Sway – stay tuned!

Hi Matt,
Great blog.
In this post you’ve shown how you can use inking in Appointments (and also tasks). I find with my version of Outlook 2013 (Office Professional), that I’m unable to use inking in appointments. All the inking tools are greyed out and unavailable. Are you able to expand on how you use this? I thought I might have to use offline calendars or something to be able to use the inking tools?
Any help would be greatly appreciated.
Cheers,
Tom.
LikeLike
Hi Tom,
I probably wasn’t clear because I was trying to keep the instructions brief – I may need to go back and adjust them! In Tasks and Calendar items, you don’t have the ability to select any “favourite” pens – you just get the colour selector active. So even though it seems greyed out, you can still just write on the lines, and change colours with the little colour icon. Let me know if that works – if you need I’ll do a quick screenshot and write a blog addendum!
Thanks
Matt
LikeLike
Mate,
If you could post a screenshot it would be great. I had another quick look and couldn’t see a colour selector. Do you have the selector in your quick address toolbar?
Are you using 365 or a bought version of Office?
Cheers,
Tom.
LikeLike
Hi Tom,
No problems! I’m using O365, but all the instructions are based on the full installation. I have access to an older machine also with both Office 2011 and Office 2013 installed, so can check that if this doesn’t work for you!
LikeLike
And as a final check – you need to click in the content frame before any of this will work – everything is greyed out if you have the curser in any of the fields above the main content (Subject or location in the calendar)
Matt
LikeLike
I still don’t seem to have the ink options available. I’ll be back at my Surface in a little bit and I’ll recheck. Potentially I could be creating the appointment from the wrong area.
LikeLike
Ok, I’ve checked again and I don’t have the colour options available at all. If I right click, then ‘create appointment’ in the calendar view, make sure the cursor is in the writing pane, then try to write with stylus, the ‘pens’ tab appears but all options are blanked out.
LikeLike
Alright, I got it working, sort of. I created another calendar (not Exchange ActiveSync) in my Gmail folder, and I’m able to ink in calendar events. So I’m ‘assuming’ that I won’t be able to use a calendar that will sync up to outlook etc to sync with my phone.
LikeLike
Hi Tom
Glad we are getting closer! My calendar syncs using outlook activesync with my phone – I wonder if it is a server setting? Will look into it a bit more!
LikeLike
Probably. Initially I thought maybe a 365 vs Professional issue. Are you using an outlook.com / live email address? Does it say “this computer only” next to your calender / tasks? And is your email configured as exchange or as POP3/IMAP? If you don’t mind me asking.
LikeLike
[…] control – but you can read about that here in my organisation trinity article. Check out this blog post for tips and tricks on using your stylus with […]
LikeLike
Hi Tom,
Great article. I used to do this exact thing using my Motion Tablet back in 2002. OneNote is still my favorite. I recently purchased a Surface Pro 3 so I can use a newer platform and still get all the functionality of my 13 year old tablet. I was amazed that this didn’t take off over a decade ago. I still have issues with other people being able to read handwritten emails on various devices, but hopefully most of that will get resolved with the new office release on IOS and Android. We’ll see.
Honestly, I still miss the ‘feel’ of the stylus on my Motion Tablet. It felt much more like paper – even though it was not a powered stylus! I have tried using screen protectors on my surface in the hopes that it would give me a bit more resistance, but it still feels like writing on glass.
Any suggestions?
LikeLike