Multiple image (page) files, handwriting OCR, image rotation – Office Lens for IOS just got a whole lot better!
I have been a big fan of Office Lens, ever since I was introduced to it at the E2 event in Seattle in 2014. For the uninitiated, it is an App available for Windows, Android and Apple phones, available in their respective app stores. Its main purpose is to digitise documents, screens, whiteboards and business cards, with some very clever smarts that detect document edges, crop the surrounding image, correct/straighten/transform the document to a regular rectangle or square, and then export the image to a range of file types.
The Apple (IOS) version of the app has just received a major update, with some amazing features that have come about because of user requests. Having had time to play with a pre-release build, I thought it would be worthwhile to document all of the features of the updated app. I will also make some suggestions on how to maximise the use of the app in the context of education and with a stylus based device that the user can annotate with. It’s the mash up of high quality digital artefacts with low fidelity but fluid digital annotations that really excites me, and this update has opened my eyes to some new possibilities.
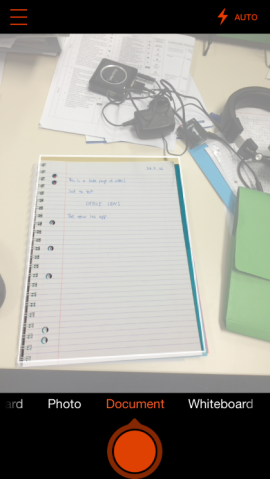
When you open the app on your iPad or iPhone, it is immediately ready to take the first image. Along the bottom are the options for the document types:
- Business card – which captures the corrected image as well as the contact information ready to add to your address book (includes simplified Chinese recognition in this release)
- Photo – takes an unedited or manipulated photo
- Document – captures a corrected image of a document
- Whiteboard – captures a corrected image of a whiteboard, also cleaning the background to pure white
Very cleverly, the app detects the edges of the document in the view of the camera, and after taking the photo, the edges are cropped out, and the document transformed to a rectangle.


If for some reason the image doesn’t detect the document correctly, pressing the rotate/resize button towards teh top right allows the user to drag the document selector to the “correct area” which will then be cropped and transformed after hitting done. If the image needs rotation, at the bottom right is the new rotate button to do just this.


Once the image is transformed and cropped, the final step is to export it, in a number of available file types – OneNote, OneDrive (as an image), Word, PowerPoint, Outlook (as an image attachment), PDF (saved to OneDrive), Mail (as an image attachment) or the Photo Library (as an image).

This is where a little bit of workflow planning and management can pay huge dividends. I’m a big OneNote user; as I mentioned at the start I like being able to annotate over digital artefacts. But finding the right OneNote notebook and then the right section to store the page can be difficult – especially if the internet connection to the phone isn’t great. So I have created a OneNote Notebook especially for Office Lens, very imaginatively called “Office Lens Synch”. The first time I ever saved to OneNote from Office Lens, I navigated to the “New Section 1” folder within this Notebook stored on my OneDrive and now whenever I save to OneNote, I know this is where it will go – no thinking needed.

And this means when I open OneNote on my computer, I just go to the Office Lens Synch Notebook, and after a few seconds my document is there and waiting as a new page.
Excitingly, the new version of the app also alows the handwritten text to be converted to typed text, by right clicking on the image and copying the text from the picture. The recognition is only as good as the handwriting is, but there are some interesting possibilities.

When docx, pptx or pdf files are saved to OneDrive from the Office Lens app, they automatically go to the My Photos>Documents>Office Lens folder. So again, with workflow in mind, I have mapped this folder to my computer so that it is automatically synchronised. This means that as soon as I hit save, these are nearly instantly available on my computer where I want them.

The real game changer with the new update to the Office Lens App, is the ability to take photos of a multi-page document, and have it saved as a single file. After taking the first image and it is cropped and transformed, simply press the +1 button at the bottom left, and take the next photo(s). When you are finished, hit the “done” button and you can then save them all – in any of the previously mentioned file types. This is great for digitising handouts or student draft work, ready for distribution as a pdf/pptx or straight into OneNote for annotating feedback on. The PowerPoint file type gives you some addition functionality, saving each image in three forms – the original photo, an image with the background cleaned up, and finally an image with objects mapped as editable vector objects. This makes turning the digital document(s) into a presentation a snap.


The update for Office Lens for IOS is really quite amazing, and with some careful thinking of workflow utilising OneDrive and OneNote, it can really be a game changer. It is quite honestly the most used app on my phone after straight internet browsing and email. I just hope sometime soon we see a Windows 10 app with the same functionality and more – this would really make my Surface a one stop device for education.
